Part 1
What is Docker?
Applications are often developed and tested on one machine. This leads to a problem more commonly known as “works on my machine”, where the developer does not know why or how the application does not work on a different machine. In addition, different parts of a system may change over time, possibly leading to the application not working. These changes may be anything from an operating system update to changes in dependencies, or even hardware changes.
Docker combines the application and its dependencies into an image that can then be run on any machine, provided it can run Docker.
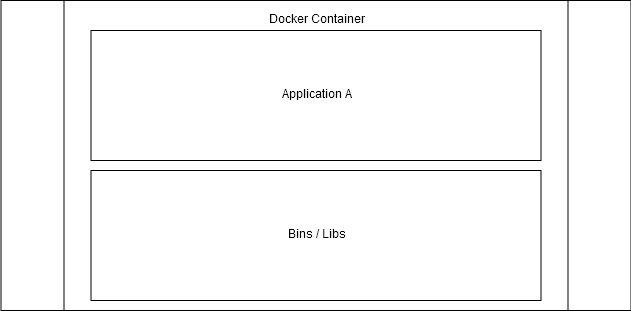
A container consists only of a given application and its dependencies.
Isn’t there already a solution for this? Virtual Machines are not the same as the Docker Engine - they solve different problems. We will not be looking into Virtual Machines in this course. However, here’s a diagram to give you a rough idea of the difference.
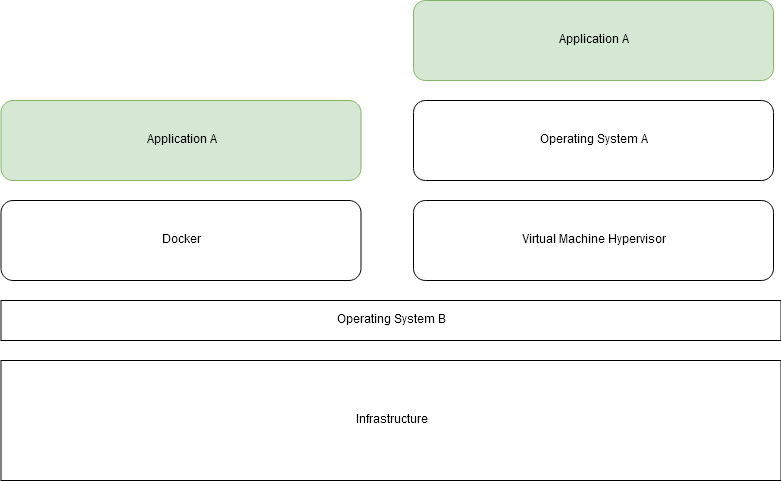
The difference between virtual machine and docker solutions after moving Application A to an incompatible system “Operating System B”.
What’s a Docker Image?
Image is a file. It is built according to an instruction file called Dockerfile. An image never changes; you can not edit an existing file, but you can create a new layer to it.
What’s a Docker Container?
Containers only contain that which is required to execute an application; and you can start, stop and interact with them. They are isolated environments in the host machine with the ability to interact with each other and the host machine itself via defined methods (TCP/UDP).
Image vs container
Containers are instances of images.
Cooking metaphor:
- Dockerfile is the shopping list (& recipe).
- Image is the ingredients.
- Container is the delicious treat.
- To get an image, you have to build it with the Dockerfile.
- You then run the image creating a container.
So, perhaps an even more fitting metaphor would be that the image is a frozen, pre-cooked meal.
Hello World docker
This is a small exercise that will run through the basics. Do not worry about the commands too much yet.
Pay attention to the time it takes to complete the command and run docker run hello-world
This command outputs the following:
$ docker run hello-world
Unable to find image 'hello-world:latest' locally
latest: Pulling from library/hello-world
d1725b59e92d: Pull complete
Digest: sha256:0add3ace90ecb4adbf7777e9aacf18357296e799f81cabc9fde470971e499788
Status: Downloaded newer image for hello-world:latest

Hello from Docker!
--application output--
The command checks if you already have the image ‘hello-world’, connects to Docker Hub, pulls the ‘hello-world’ image and runs it, creating a container.
Congratulations, you’ve now ran your first dockerized application. Let’s get used to the commands before going forward.
Docker CLI basics
The Docker CLI is usually referenced as the “docker engine”, see docs for more information
Even though you will find over 50 commands in the documentation, only a handful of them is needed for general use. You’ll find a list of the most commonly used basic commands at the end of this section.
To list images you currently have downloaded, run: docker images
As you can see, the hello-world we recently ran is still lingering in the images. Let’s run it a couple more times:
docker run hello-world
As we already had previously downloaded hello-world, Docker noticed that you already have the image and ran it straight away. Look at the list of images again. It should reveal that there is still only one hello-world image.
Let’s remove the image since we don’t need it anymore. The command docker rmi hello-world can be used to remove the hello-world image. However, this should fail with the following error:
Error response from daemon: conflict: unable to remove repository reference "hello-world" (must force) - container <container ID> is using its referenced image <image ID>
This means that a container currently exists which was created from the image hello-world, and that removing hello-world could have consequences. So before removing images, you should have the referencing container removed first. Forcing is usually a bad idea, especially as we are still learning.
To list containers that are running, run: docker ps
Since hello-world has already exited, it is not listed. Run docker ps -a to list all containers.
Notice that containers have a container ID and name. The name is autogenerated to be something like “objective_austin”.
When we have a lot of different containers, we can use grep (or another similar utility) to filter the list:
docker ps -a | grep hello-world
Let’s remove the container with the rm command. It accepts a container’s name or ID as its arguments. Notice that the command also works with the first few characters of an ID. For example, if a container’s ID is 3d4bab29dd67, you can use docker rm 3d to delete it. Using the shorthand for the ID will not delete multiple containers, so if you have two IDs starting with 3d, a warning will be printed and neither will be deleted. You can also use multiple arguments: docker rm id1 id2 id3
If you have hundreds of stopped containers and you wish to delete them all, you should use docker container prune
TIP: prune was introduced in 1.13, and in previous versions you can use
docker rm $(docker ps -q -f status=exited)where -q prints just container IDs and -f filters the list of containers to only those where status is exited
After removing all of the hello-world containers, run docker rmi hello-world to delete the image. You can use docker images to confirm that the image is not listed.
You can also use pull command to download images without running them: docker pull hello-world
Let’s try starting a new container:
docker run nginx
Notice how the command line appears to freeze after pulling and starting the container. This is because nginx is now running in the current terminal, blocking the input. Let’s exit by pressing control + c and try again with the -d flag.
docker run -d nginx
The -d flag starts a container detached, meaning that it runs in the background. The container can be seen with docker ps
Now if we try to remove it, it will fail:
docker rm <container id or name>
Error response from daemon: You cannot remove a running container f72c583c982ca686b0826fdc447f04710e78ff6c25dc1ddc7c427cc35eadf5f0. Stop the container before attempting removal or force remove
We should first stop the container using docker stop <container id or name>, and then use rm.
Forcing is also a possibility and we can use docker rm --force <container id or name> safely this time.
It’s common for the docker daemon to become clogged over time with old images and containers.
MOST USED COMMANDS
docker ps -a |
Lists all containers |
docker images |
Lists all images |
docker pull <image> |
Pulls image from a docker registry called docker hub |
docker rm <container-id> |
Removes a container, you can use either container name or id |
docker rmi <image-id> |
Removes an image, you can use either image name or id |
docker stop <container-id> |
Stops a container, you can use either container name or id |
docker run <image> |
Runs an image creating a container, you can use either image name or id |
docker exec <container-id> |
Executes a command inside the container |
Where do the images come from?
When running a command such as docker run hello-world, Docker will automatically search Docker Hub for the image if it is not found locally.
This means that we can pull and run any public image from Docker’s servers. For example‚ if we wanted to start an instance of the PostgreSQL database, we could just run docker run postgres, which would pull and run https://hub.docker.com/_/postgres/.
We can search for images in the Docker Hub with docker search. Try running docker search hello-world.
The search finds plenty of results, and prints each image’s name, short description, amount of stars, and “official” and “automated” statuses.
NAME                         DESCRIPTION    STARS   OFFICIAL   AUTOMATED
hello-world                  Hello World!…  699     [OK]
kitematic/hello-world-nginx  A light-weig…  112
tutum/hello-world            Image to tes…  56                 [OK]
...
Let’s examine the list.
The first result, hello-world, is an official image. Official images are curated and reviewed by Docker, Inc. and are usually actively maintained by the authors. They are built from repositories in the docker-library.
When browsing the CLI’s search results, you can recognize an official image from the “[OK]” in the “OFFICIAL” column and also from the fact that the image’s name has no prefix (aka organization/user). When browsing Docker Hub, the page will show “Docker Official Images” as the repository, instead of a user or organization. For example, see the Docker Hub page of the hello-world image.
The third result, tutum/hello-world, is marked as “automated”. This means that the image is automatically built from the source repository. Its Docker Hub page shows its previous “Builds” and a link to the image’s “Source Repository” (in this case, to GitHub) from which Docker Hub builds the image.
The second result, kitematic/hello-world-nginx, is neither an official nor automated image.
We can’t really know what the image is built from, since its Docker Hub page has no links to any repos. The only thing its Docker Hub page reveals is that the image is 4 years old. Even if the image’s “Overview” section had links to a repository, we would have no guarantees that the published image was actually built from that source.
There are also other Docker registries competing with Docker Hub, such as quay. However, docker search will only search Docker Hub, so we’ll need to use the registry’s web pages to search for images. Take a look at the page of the nordstrom/hello-world image on quay. The page shows the command to use to pull the image, which reveals that we can also pull images from hosts other than Docker Hub:
docker pull quay.io/nordstrom/hello-world
So, if the host’s name (here: quay.io) is omitted, it will pull from Docker Hub by default.
A detailed look into an image
Let’s move on to something more relevant than ‘hello-world’, for example to Ubuntu from Docker Hub. It is one of the most common Docker images to use as a base for your own image.
Anyway, let’s pull Ubuntu! docker pull ubuntu
Let’s look at the first lines:
  Using default tag: latest
  latest: Pulling from library/ubuntu
Since we didn’t specify a tag, Docker defaulted to latest, which is usually the latest image built and pushed to the registry. However, in this case the repository’s README says that the ubuntu:latest tag points to the “latest LTS” instead, since that’s the version recommended for general use.
Images can be tagged to save different versions of the same image. You define an image’s tag by adding :<tag> after the image’s name.
Ubuntu’s Docker Hub page reveals that there’s a tag named 16.04 which promises us that the image is based on Ubuntu 16.04. Let’s pull that as well:
$ docker pull ubuntu:16.04

  16.04: Pulling from library/ubuntu
  c2ca09a1934b: Downloading [============================================>      ]  34.25MB/38.64MB
  d6c3619d2153: Download complete
  0efe07335a04: Download complete
  6b1bb01b3a3b: Download complete
  43a98c187399: Download complete
Images are composed of different layers that are downloaded in parallel to speed up the download.
We can also tag images locally for convenience, for example docker tag ubuntu:16.04 ubuntu:xenial creates the tag ubuntu:xenial which refers to ubuntu:16.04.
Tagging is also a way to “rename” images. Run docker tag ubuntu:16.04 fav_distro:xenial and check docker images to see what effects the command had.
We can now create a new Ubuntu container and execute the uptime command by running docker run fav_distro:xenial uptime
Mac/win only: Notice how the uptime is the uptime of your moby virtual machine.
We’ll look more into the Ubuntu image in part 3.
Running and stopping containers
Let’s run a container in the background:
docker run -d --name looper ubuntu:16.04 sh -c 'while true; do date; sleep 1; done'
-
The first part,
docker run -d, should be familiar by now. -
Because we ran the container with
--name looper, we can now reference it easily. -
The image is
ubuntu:16.04and what follows it is the command given to the container.
And to check that it’s running, run docker ps
Lets follow ‘-f’ the output of logs with docker logs -f looper
  Fri Oct 19 11:51:05 UTC 2018
  Fri Oct 19 11:51:06 UTC 2018
  Fri Oct 19 11:51:07 UTC 2018
  ...
Let’s test pausing the looper without exiting or stopping it. In another terminal run docker pause looper. Notice how the logs output has paused in the first terminal. To unpause run docker unpause looper.
Keep the logs open and attach to the running container from the second terminal using ‘attach’:
$ docker attach looper
  Mon Jan 15 19:26:54 UTC 2018
  Mon Jan 15 19:26:55 UTC 2018
  ...
Now you have process logs (STDOUT) running in two terminals. Now press control+c in the attach window. The container is stopped because the process is no longer running.
If we want to attach to a container while making sure we don’t close it from the other terminal we can disable signal proxying. Let’s start the stopped container with docker start looper and attach to it with --sig-proxy=false.
Then try control+c.
$ docker start looper

$ docker attach --sig-proxy=false looper
  Mon Jan 15 19:27:54 UTC 2018
  Mon Jan 15 19:27:55 UTC 2018
  ^C
The container will continue running. Control+c now only disconnects you from the STDOUT.
To enter a container, we can start a new process in it.
$ docker exec -it looper bash

  root@2a49df3ba735:/# ps aux

  USER       PID %CPU %MEM    VSZ   RSS TTY      STAT START   TIME COMMAND
  root         1  0.0  0.0   4496  1716 ?        Ss   10:31   0:00 sh -c while true; do date; sleep 1; done
  root       271  0.0  0.0   4496   704 ?        Ss   10:33   0:00 sh
  root       300  0.0  0.0  18380  3364 pts/0    Ss   10:33   0:00 bash
  root       386  0.0  0.0   4368   672 ?        S    10:33   0:00 sleep 1
  root       387  0.0  0.0  36836  2900 pts/0    R+   10:34   0:00 ps aux
In our command -it is short for -i and -t where -i is “interactive, connect STDIN” and -t “allocate a pseudo-TTY”. Or to put it more simply, -it allows you to interact with the container by using the command line. From the ps aux listing we can see that our bash process got PID (process ID) of 300.
Now that we’re inside the container it behaves as you’d expect from ubuntu, and we can terminate the container by killing the process with kill 1, or exit the container with exit and then either kill or stop the container.
Our looper won’t stop for a SIGTERM signal sent by a stop command. To terminate the process, stop follows the SIGTERM with a SIGKILL after a grace period. In this case it’s simply faster to use kill.
$ docker kill looper
$ docker rm looper
Running the previous two commands is basically equivalent to running docker rm --force looper
Let’s start another process with -it and also with --rm in order to remove it automatically after it has exited. This means that there is no garbage containers left behind, but also that docker start can not be used to start the container after it has exited.
docker run -d --rm -it --name looper-it ubuntu:16.04 sh -c 'while true; do date; sleep 1; done'
Now let’s attach to the container and hit control+p, control+q to detach us from the STDOUT.
$ docker attach looper-it

  Mon Jan 15 19:50:42 UTC 2018
  Mon Jan 15 19:50:43 UTC 2018
  ^P^Qread escape sequence
Note that hitting ^C would still kill (and remove due to --rm) the process, because the docker attach command did not include --sig-proxy=false
Creating your own dockerized project
Create a folder and a file called Dockerfile inside it with the following content:
FROM ubuntu:16.04

WORKDIR /mydir
RUN touch hello.txt
COPY local.txt .
RUN wget http://example.com/index.html
CMD ["/bin/bash"]
-
WORKDIRwill create and set the current working directory to/mydirafter this directive -
RUNwill execute a command with/bin/sh -cprefix - Because ofWORKDIRthis is essentially the same asRUN touch /mydir/hello.txt -
COPYadds a local file to the second argument. It’s preferred to useCOPYinstead ofADDwhen you are just adding files (ADD has all kinds of magic behaviour attached to it) -
CMDis the command that will be executed when usingdocker run
Then we’ll build it by running build with context argument ., which means that we have to be in the same directory (we could run this build from another directory and then give the path here)
$ docker build .
This fails in the COPY, because the local.txt doesn’t exist. Fix that and build again to see the next error.
Before fixing the next error, notice how all steps that modify the image will say ` —> Using cache` - this is because the Docker daemon caches all the operations for speed. Changing any build directive will invalidate all the caches after that line.
Now we will find out that wget doesn’t exist in the Ubuntu base image. We’ll need to add it with apt-get as this is Ubuntu. But, if we just add:
RUN apt-get install -y wget
It will fail because the apt sources are not part of the image to bring down the size (and they would be old anyway). When we add lines
RUN apt-get update
RUN apt-get install -y wget
the image should build nicely and at the end it will say something like Successfully built 66b527252f32, where the 66b527252f32 is a random name for our image.
Before running our image we have a looming problem ahead of us: because apt-get update is run in a separate step that is cached. If we add another package in the apt-get install -y line some other day, the sources might have changed and thus the installation will fail. When something depends on another command, it’s best practise to run them together, like this:
RUN apt-get update && apt-get install -y wget
We don’t have to give a command (to be run in the container) after the image since the ubuntu base image sets it to bash on the last line.
FROM ubuntu:16.04

WORKDIR /mydir
RUN apt-get update && apt-get install -y wget

RUN touch hello.txt
COPY local.txt .
RUN wget http://example.com/index.html
The random name for our image is also not ideal, because now we need to separately docker tag 66b527252f32 myfirst to have a sensible name for it, so let’s build it again to also tag it:
$ docker build -t myfirst .
Now let’s run our image.
$ docker run -it myfirst
  root@accf99660aeb:/mydir# ls
  hello.txt  index.html  local.txt
Our WORKDIR was last set to /mydir so our inherited bash command is started in that directory. Also note how our hostname accf99660aeb equals the container id. Before exiting the container, let’s create one file (in addition to the files created by our Dockerfile)
$ touch manually.txt
$ exit
Now we can use diff to compare changes between our image myfirst and container:
$ docker diff accf

  C /mydir
  A /mydir/manually.txt
  C /root
  A /root/.bash_history
What we discover is that in addition to our manually.txt file, bash “secretly” created a history file. We could create a new image from these changes (myfirst + changes = newimage) with
$ docker commit accf99660aeb myfirst-pluschanges
Let’s try creating a new container from the new image, this time by setting the command to “ls -l”. Also notice how we don’t have to allocate pseudo-TTY or connect STDIN since our command is not interactive (and will exit anyway immediately)
$ docker run myfirst-pluschanges ls -l
  total 4
  -rw-r--r-- 1 root root    0 Jan  5 11:59 hello.txt
  -rw------- 1 root root 1270 Aug  9  2013 index.html
  -rw-r--r-- 1 root root    0 Jan  5 12:18 manually.txt
And as expected, our manually.txt file is now in the image.
Bigger and more complex image
Now let’s start moving towards a more meaningful image. youtube-dl a program that downloads youtube videos https://rg3.github.io/youtube-dl/download.html Let’s add it to the image - but this time instead of doing it directly in Dockerfile, let’s try another approach that is sometimes easier than our current process where we add things to it and try to see if it builds. This time we’ll open up an interactive session and test stuff beforehand “storing” it in our Dockerfile. By following the youtube-dl install instructions blindly we’ll see that…
$ docker run -it myfirst
  root@8c587232a608:/mydir# sudo curl -L https://yt-dl.org/downloads/latest/youtube-dl -o /usr/local/bin/youtube-dl
  bash: sudo: command not found
..sudo is not installed, but since we are root we don’t need it now, so let’s try again without…
root@8c587232a608:/mydir# curl -L https://yt-dl.org/downloads/latest/youtube-dl -o /usr/local/bin/youtube-dl
bash: curl: command not found
..and we see that curl is not installed either - we could just revert to use wget, but as an exercise, let’s add curl with apt-get since we already have the apt sources in our image (that hopefully are still valid)
$ apt-get install -y curl
$ curl -L https://yt-dl.org/downloads/latest/youtube-dl -o /usr/local/bin/youtube-dl
Then we’ll add permissions and run it:
$ chmod a+rx /usr/local/bin/youtube-dl
$ youtube-dl
  /usr/bin/env: 'python': No such file or directory
Okay - On the top of the youtube-dl download page we’ll notice that
Remember youtube-dl requires Python version 2.6, 2.7, or 3.2+ to work except for Windows exe.
So let’s add python
$ apt-get install -y python
And let’s run it again
$ youtube-dl

  WARNING: Assuming --restrict-filenames since file system encoding cannot encode all characters. Set the LC_ALL environment variable to fix this.
  Usage: youtube-dl [OPTIONS] URL [URL...]

  youtube-dl: error: You must provide at least one URL.
  Type youtube-dl --help to see a list of all options.
It works (we just need to give an URL), but we notice that it outputs a warning about LC_ALL. In a regular Ubuntu desktop/server install the localization settings are (usually) set, but in this image they are not set, as we can see by running env in our container. To fix this without installing additional locales, see this: https://stackoverflow.com/a/41648500
$ LC_ALL=C.UTF-8 youtube-dl
And it works! Let’s persist it for our session and try downloading a video:
$ export LC_ALL=C.UTF-8
$ youtube-dl https://imgur.com/JY5tHqr
So now when we know what do, let’s add these to the bottom of our Dockerfile - by adding the instructions to the bottom we preserve our cached layers - this is handy practise to speed up creating the initial version of a Dockerfile when it has time consuming operations like downloads.
...
RUN apt-get install -y curl python
RUN curl -L https://yt-dl.org/downloads/latest/youtube-dl -o /usr/local/bin/youtube-dl
RUN chmod a+x /usr/local/bin/youtube-dl
ENV LC_ALL=C.UTF-8
CMD ["/usr/local/bin/youtube-dl"]
-
Instead of using
RUN export LC_ALL=C.UTF-8we’ll store the environment directly in the image with ENV -
We’ll also override
bashas our image command (set on the base image) withyoutube-dlitself. This won’t work, but let’s see why.
When we build this as youtube-dl
$ docker build -t youtube-dl .
And run it:
$ docker run youtube-dl

  Usage: youtube-dl [OPTIONS] URL [URL...]

  youtube-dl: error: You must provide at least one URL.

  Type youtube-dl --help to see a list of all options.
So far so good, but now the natural way to use this image would be to give the URL as an argument:
$ docker run youtube-dl https://imgur.com/JY5tHqr

  /usr/local/bin/docker: Error response from daemon: OCI runtime create failed: container_linux.go:296: starting container process caused "exec: \"https://imgur.com/JY5tHqr\": stat https://imgur.com/JY5tHqr: no such file or directory": unknown.

  ERRO[0001] error waiting for container: context canceled
Now our URL became the command (CMD). Luckily we have another way to do this: we can use ENTRYPOINT to define the main executable and then docker will combine our run arguments for it.
ENTRYPOINT ["/usr/local/bin/youtube-dl"]
And now it works like it should:
$ docker build -t youtube-dl .
$ docker run youtube-dl https://imgur.com/JY5tHqr

[Imgur] JY5tHqr: Downloading webpage
[download] Destination: Imgur-JY5tHqr.mp4
[download] 100% of 190.20KiB in 00:0044MiB/s ETA 00:000
ENTRYPOINT vs CMD can be confusing - in a properly set up image such as our youtube-dl the command represents an argument list for the entrypoint. By default entrypoint is set as /bin/sh and this is passed if no entrypoint is set. This is why giving path to a script file as CMD works: you’re giving the file as a parameter to /bin/sh.
In addition there are two ways to set them: exec form and shell form. We’ve been using the exec form where the command itself is executed. In shell form the command that is executed is wrapped with /bin/sh -c - it’s useful when you need to evaluate environment variables in the command like $MYSQL_PASSWORD or similar.
In the shell form the command is provided as a string without brackets. In the exec form the command and it’s arguments are provided as a list (with brackets), see the table below:
| Dockerfile | Resulting command |
|---|---|
| ENTRYPOINT /bin/ping -c 3 CMD localhost |
/bin/sh -c ‘/bin/ping -c 3’ /bin/sh -c localhost |
| ENTRYPOINT [“/bin/ping”,”-c”,”3”] CMD localhost |
/bin/ping -c 3 /bin/sh -c localhost |
| ENTRYPOINT /bin/ping -c 3 CMD [“localhost”] |
/bin/sh -c ‘/bin/ping -c 3’ localhost |
| ENTRYPOINT [“/bin/ping”,”-c”,”3”] CMD [“localhost”] |
/bin/ping -c 3 localhost |
Now we have two problems:
-
Minor: Our container build process creates many layers resulting in increased image size
-
Major: The downloaded files stay in the container
Let’s fix the major issue first. We’ll look at the minor issue in part 3.
By inspecting docker ps -a we can see all our previous runs. When we filter this list with
$ docker ps -a --last 3

  CONTAINER ID        IMAGE               COMMAND                   CREATED                  STATUS                          PORTS               NAMES

be9fdbcafb23        youtube-dl          "/usr/local/bin/yout…"    Less than a second ago   Exited (0) About a minute ago                       determined_elion

b61e4029f997        f2210c2591a1        "/bin/sh -c \"/usr/lo…"   Less than a second ago   Exited (2) About a minute ago                       vigorous_bardeen

326bb4f5af1e        f2210c2591a1        "/bin/sh -c \"/usr/lo…"   About a minute ago       Exited (2) 3 minutes ago                            hardcore_carson
We’ll see that the last container was be9fdbcafb23 or determined_elion for us humans.
$ docker diff determined_elion

  C /mydir
  A /mydir/Short introduction to Docker (Scribe)-UFLCdmfGs7E.mp4
Let’s try docker cp command to copy the file (notice the quotes because of our filename that has spaces)
$ docker cp "determined_elion://mydir/Short introduction to Docker (Scribe)-UFLCdmfGs7E.mp4" .
And now we have our file locally. This doesn’t really fix our issue, so let’s continue:
Volumes: bind mount
By bind mounting a host (our machine) folder to the container we can get the file directly to our machine. Let’s start another run with -v option, that requires an absolute path. We mount our current folder as /mydir in our container, overwriting everything that we have put in that folder in our Dockerfile.
$ docker run -v $(pwd):/mydir youtube-dl https://imgur.com/JY5tHqr
Note: the Docker for Mac/Win has some magic so that the directories from our host become available for the
mobyvirtual machine allowing our command to work as it would on a Linux machine.
So a volume is simply a folder (or a file) that is shared between the host machine and the container. If a file in volume is modified by a program that’s running inside the container the changes are also saved from destruction when the container is shut down as the file exists on the host machine. This is the main use for volumes as otherwise all of the files wouldn’t be accessible when restarting the container. Volumes also can be used to share files between containers and run programs that are able to load changed files.
In our youtube-dl we wanted to mount the whole directory since the files are fairly randomly named. If we wish to create a volume with only a single file we could also do that by pointing to it. For example -v $(pwd)/material.md:/mydir/material.md this way we could edit the material.md locally and have it change in the container (and vice versa). Note also that -v creates a directory if the file does not exist.
Allowing external connections into containers
The details on how programs communicate are not detailed in this course. Courses on Operating Systems and Networking courses explain these. On this course you only need to know the following simplified basics:
- Sending messages: Programs can send messages to URL addresses such as this: http://127.0.0.1:3000 where http is the protocol, 127.0.0.1 is a ip address, and and 3000 is a port. Note the ip part could also be a hostname: 127.0.0.1 is always also named localhost so instead you could use http://localhost:3000.
- Receiving messages: Programs can be assigned to listen to any available port. If a program is listening for traffic on port 3000 and a message is sent to that port it will receive it (and depending on the message process it).
- note that the address 127.0.0.1 and hostname localhost are special ones, they refer to the machine or container itself, so if you are on a container and send message to localhost, the target is the same container, simillarly if you are running a software in your laptop (outside of containers) and send message to localhost, the target is the laptop
- an exception to this is that you can map your laptop’s (=host machine) port to a container port, as it is explained in the following
Opening a connection from outside world to a docker container happens in two steps:
-
Exposing port
-
Publishing port
Exposing a container port means that you tell Docker that the container listens to a certain port.
Publishing a port means that Docker will map containers ports to host (your machine) ports.
To expose a port, add line EXPOSE <port> in your Dockerfile
To publish a port, run the container with -p <host-port>:<container-port>
For example: A certain application uses port 4567 to accept udp connections.
EXPOSE 4567 in the Dockerfile will allow container created from the image to accept connections.
Lets say that the image name is “app-in-port”
docker run -p 1234:4567 app-in-port
Now you could make connection to host port 1234 (for example http://localhost:1234) and it will be mapped to the application port.
If you leave out the host port and only specify the container port, docker will automatically choose a free port as the host port:
docker run -p 4567 app-in-port
The docker port command can be used to list the port mappings for a container:
$ docker run -d -p 4567 app-in-port
0249795b3778f058314b611e3f0ef4406d730cfb098065c591de44668a732de3

$ docker port 0249
4567/tcp -> 0.0.0.0:32772
You can also limit connections to certain protocol only, in this case udp by adding the protocol at the end: EXPOSE 4567/udp and -p 1234:4567/udp respectively.
Publishing projects in Docker Hub
Go to https://hub.docker.com/ to create an account. You can configure docker hub to build your images for you, but using push works as well.
Lets publish the youtube-dl image. Log in and navigate to your dashboard and press Create Repository. The namespace can be either your personal account or an organization account. For now lets stick to personal accounts and write something descriptive such as youtube-dl to repository name. We’ll need to remember it in part 2.
Set visibility to public. Free accounts have access to 1 free private repository.
In the past organization accounts had 0 free private repositories and accounts can be converted into organization accounts. This would lead to 1/0 private repositories for organization accounts if account had private repository before conversion.
Next we need to rename the image:
docker tag youtube-dl <username>/<repositoryname>
And the last thing we need is to authenticate our push by logging in:
docker login
Pushing should now work without problems:
docker push <username>/<repositoryname>
Epilogue, or rather, a recap
We started by learning what Docker container and image mean. Basically we stated from an empty ubuntu with nothing installed into it. It’s also possible to start from something else, but for now ubuntu had been enough.
This meant that we had to install almost everything manually, either from the command line or by using a setup file “Dockerfile” to install whatever we needed for the task at hand.
The process of dockerizing the applications meant a bit of configuration on our part, but now that we’ve done it and built the image anyone can pick up and run the application; no possible dependency or versioning issues.
Understanding the architecture and the technologies used is also part of making correct choices with the setup. This lead us to read the REAMEs and documentation of the software involved in the setup, not just Docker. Fortunately in real life it’s often us who are developing and creating the Dockerfile.
The starting and stopping of containers is a bit annoying, not to mention running two applications at the same time. If only there was some way, a tool, to make it simpler… to compose.